

forward_backward() and optim_step() round trip as text-only supervised fine-tuning (SFT). The training loop, checkpointing, and deployment stay the same; only the input construction changes.
This guide fine-tunes with LoRA on hiyouga/geometry3k, a dataset of geometry diagrams with text problems and numeric answers, then deploys the checkpoint and queries it with image prompts. The data-building and loss-masking techniques work with any image-and-text dataset. Vision training supports a subset of the supported base models: Qwen VL (Qwen3.5, Qwen3.6, Qwen3.8), Kimi (K2.6, K2.7 Code), and Nemotron 3.5 Super VL.
Prerequisites
- A workspace API key.
- Python 3.12+ and uv to install dependencies and run the scripts.
- The Baseten CLI to deploy the checkpoint and shut down the run.
1
Export your API key
Export the key as
BASETEN_API_KEY:2
Install the Baseten CLI
- macOS or Linux
- Windows
Terminal
Install
Create a uv project and install the dependencies:Create the training script
The script opens a training run on a base model, converts dataset examples into training data, and trains a LoRA adapter before saving a checkpoint. Create a file namedtrain_vision.py in the project directory:
train_vision.py
ServiceClient opens a session with Baseten. create_lora_training_client provisions a trainer for the base model and attaches a LoRA adapter with the rank you set. get_tokenizer returns the base model’s tokenizer, and the image processor parses image dimensions later in the script:
train_vision.py
Turn examples into training data
Each example in thegeometry3k dataset contains an image, a problem, and an answer. The trainer uses each example as a Datum:
model_inputcontains oneImageChunkwith the image bytes and one text chunk with the problem and answer tokens.loss_fn_inputssupplies the loss targets through aTensorDatanamedtarget_tokens, with one target token per input position.
ImageChunk takes the image bytes inline, as JPEG or PNG. One chunk holds one image; add more chunks for more images. Pass the image already resized: the trainer doesn’t resize images and rejects a decoded image larger than 18 MB or 50 megapixels.
ImageChunk.expected_tokens tells the trainer how many input tokens the image becomes. The model replaces the image with exactly that many image tokens, so the number must match what the model actually produces. For Qwen VL models, compute it from the image processor as prod(image_grid_thw) // merge_size**2.
Add these functions to build a Datum from a dataset example:
train_vision.py
ImageChunk into expected_tokens copies of the model’s image-placeholder token ID and appends the text chunk. Because to_datum omits the final answer token from the input, the input sequence is [image: expected_tokens] [prompt: len(p)] [answer: len(a) - 1].
Set the loss targets
forward_backward compares each input position against the token that should follow it. The trainer doesn’t shift labels, so to_datum drops the final answer token from the input and assigns next-token targets to the remaining positions. The resulting input and target_tokens have the same length: expected_tokens + len(p) + len(a) - 1.
Mask the image and prompt positions with -100, which cross-entropy ignores, except for the last prompt position. That position targets the first answer token. The remaining positions target the subsequent answer tokens, including the final answer token:
Add the training loop
At each training step,forward_backward() runs the model on a batch and accumulates gradients. Then optim_step() applies them with AdamParams. Add the loop to train_vision.py:
train_vision.py
train[:4] slice limits this tutorial to four examples. For a complete fine-tune, use the full split. Image examples use more memory than text-only examples because the model processes image tensors and text together. Start with a small batch size, and increase it if GPU memory allows.
Save a checkpoint
Save the tuned adapter as a named checkpoint withsave_weights_for_sampler(). The checkpoint stays available after the training session ends. Add the save call to train_vision.py:
train_vision.py
Run the training script
Run the script:LOOPS_REUSE_FROM_RUN_ID.
The script prints the number of prepared examples, the training loss, and the checkpoint path:
Stop the training resources
The trainer continues to bill after the script exits. The checkpoint path includes the run ID afterbt://loops:. Replace <run_id> with your run ID, not the example ID e3m1863. List your active Loops runs and deactivate the run you created:
Deploy the checkpoint
Deploy the checkpoint to Dedicated Inference. The deployment loads your LoRA adapter on top of the base weights and serves an OpenAI-compatible/v1/chat/completions endpoint for image inputs. Before you deploy, add an hf_access_token to workspace secrets. The deployment uses this token to download the base weights from Hugging Face.
List the checkpoints for your run, replacing <run_id> with the same run ID:
<checkpoint_id> with the ID of your vision-step-1 checkpoint from the list output. The deploy command asks for a model name, GPU type, GPU count, and Hugging Face secret name. The default secret name is hf_access_token.
<model_id> and <deployment_id> in all remaining commands. Check the deployment status:
ACTIVE or SCALED_TO_ZERO. If the status is SCALED_TO_ZERO, the first request starts a replica and takes longer than later requests.
Send an image prompt
Send the image as base64-encoded data in the OpenAIimage_url format.
The example sends this geometry diagram with the text prompt “Find x.”:
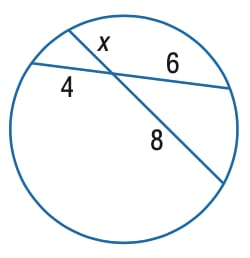
build_request.py to encode the image and build the request:
build_request.py
request.json with the base64-encoded image and the prompt:
model is the checkpoint name. Send the request:
- cURL
- Baseten CLI
Send a text-only prompt
The same deployment accepts text-only requests. Omit the image content block:- cURL
- Baseten CLI
Deactivate the deployment
The deployment bills for its GPU while it’s active. Deactivate it when you finish testing:--yes to skip the confirmation prompt. Deactivation doesn’t delete the checkpoint, so you can deploy it again.
Next steps
- Deploy a checkpoint: The full deploy flow, including the dashboard option and the
--configflag for non-interactive deploys. - Train on your data: The text-only SFT guide. Vision training follows the same round trip.
- Loops concepts: Sessions, trainers, samplers, checkpoints, and how weight sync works.
- Migrate from Tinker: If you’re porting a Tinker vision recipe, the
ImageChunktype is call-compatible. Loops doesn’t supportImageAssetPointerChunk.